概述
Spring Security这是一种基于Spring AOP和Servlet过滤器的安全框架。它提供全面的安全性解决方案,同时在Web请求级和方法调用级处理身份确认和授权。在Spring Framework基础上,Spring Security充分利用了依赖注入(DI,Dependency Injection)和面向切面技术。
- 概述
- Filter
- HTTP
- FilterChain
- FilterSecurityInterceptor
- AuthenticationManager
- AccessDecisionManager
- SecurityMetadataSource
本文的宗旨并非描述如何从零开始搭建一个 “hello world” 级的demo,或者列举有哪些可配置项(这种类似于词典的文档,没有比参考书更合适的了),而是简单描述spring-security项目的整体结构,设计思想,以及某些重要配置做了什么。
本文所有内容基于spring-security-4.0.1.RELEASE ,你可以在Github中找到它,或者使用Maven获取,引入spring-security-config是为了通过命名空间简化配置。
<dependency>
    <groupId>org.springframework.security</groupId>
    <artifactId>spring-security-web</artifactId>
    <version>4.0.1.RELEASE</version>
</dependency>
<dependency>
    <groupId>org.springframework.security</groupId>
    <artifactId>spring-security-config</artifactId>
    <version>4.0.1.RELEASE</version>
</dependency>
Filter
spring-security的业务流程是独立于项目的,我们需要在web.xml中指定其入口,注意该过滤器必须在项目的过滤器之前。
<filter>
    <filter-name>springSecurityFilterChain</filter-name>
    <filter-class>org.springframework.web.filter.DelegatingFilterProxy</filter-class>
</filter>
<filter-mapping>
    <filter-name>springSecurityFilterChain</filter-name>
    <servlet-name>/*</servlet-name>
</filter-mapping>
值得一提的是,该过滤器的名字具有特殊意义,没有特别需求不建议修改,我们可以在该过滤的源码中看到,其过滤行为委托给了一个delegate对象,该delegate对象是一个从spring容器中获取的bean,依据的beanid就是filter-name。
@Override
protected void initFilterBean() throws ServletException {
	synchronized (this.delegateMonitor) {
		if (this.delegate == null) {

			if (this.targetBeanName == null) {
				this.targetBeanName = getFilterName();
			}

			WebApplicationContext wac = findWebApplicationContext();
			if (wac != null) {
				this.delegate = initDelegate(wac);
			}
		}
	}
}
HTTP
我们可以在security中声明多个http元素,每个http元素将产生一个FilterChain,这些FilterChain将按照声明顺序加入到FilterChainProxy中,而这个FilterChainProxy就是web.xml中定义的springSecurityFilterChain内部的delegate。
<security:http security="none" pattern="/favicon.ico" />
<security:http security="none" pattern="/resources/**" />
<security:http security="none" pattern="/user/login" />
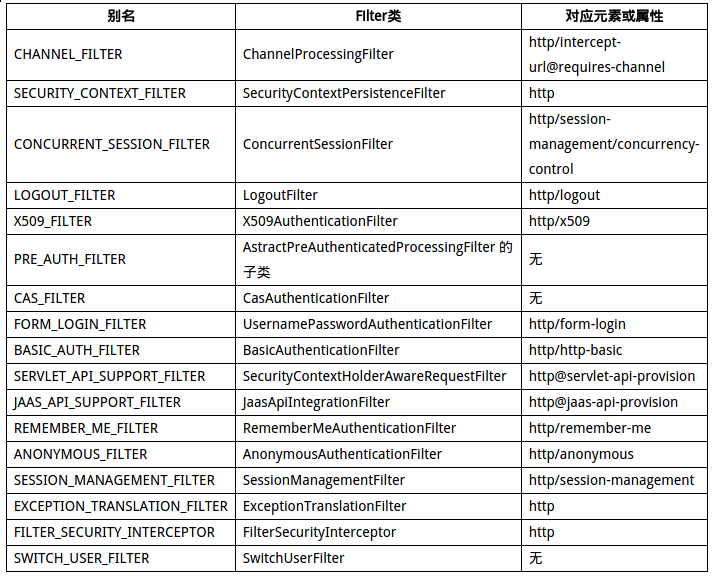
在http元素也就是FilterChain中,以责任链的形式存在多个Filter,这些Filter真正执行过滤操作,http标签中的许多配置项,如 <security:http-basic/>、<security:logout/>等,其实就是创建指定的Filter,以下表格列举了这些Filter。

利用别名,我们可以将自定义的过滤器加入指定的位置,或者替换其中的某个过滤器。
<security:custom-filter ref="filterSecurityInterceptor" before="FILTER_SECURITY_INTERCEPTOR" />
整体来看,一个FilterChainProxy中可以包含有多个FilterChain,一个FilterChain中又可以包含有多个Filter,然而对于一个既定请求,只会使用其中一个FilterChain。
FilterChain

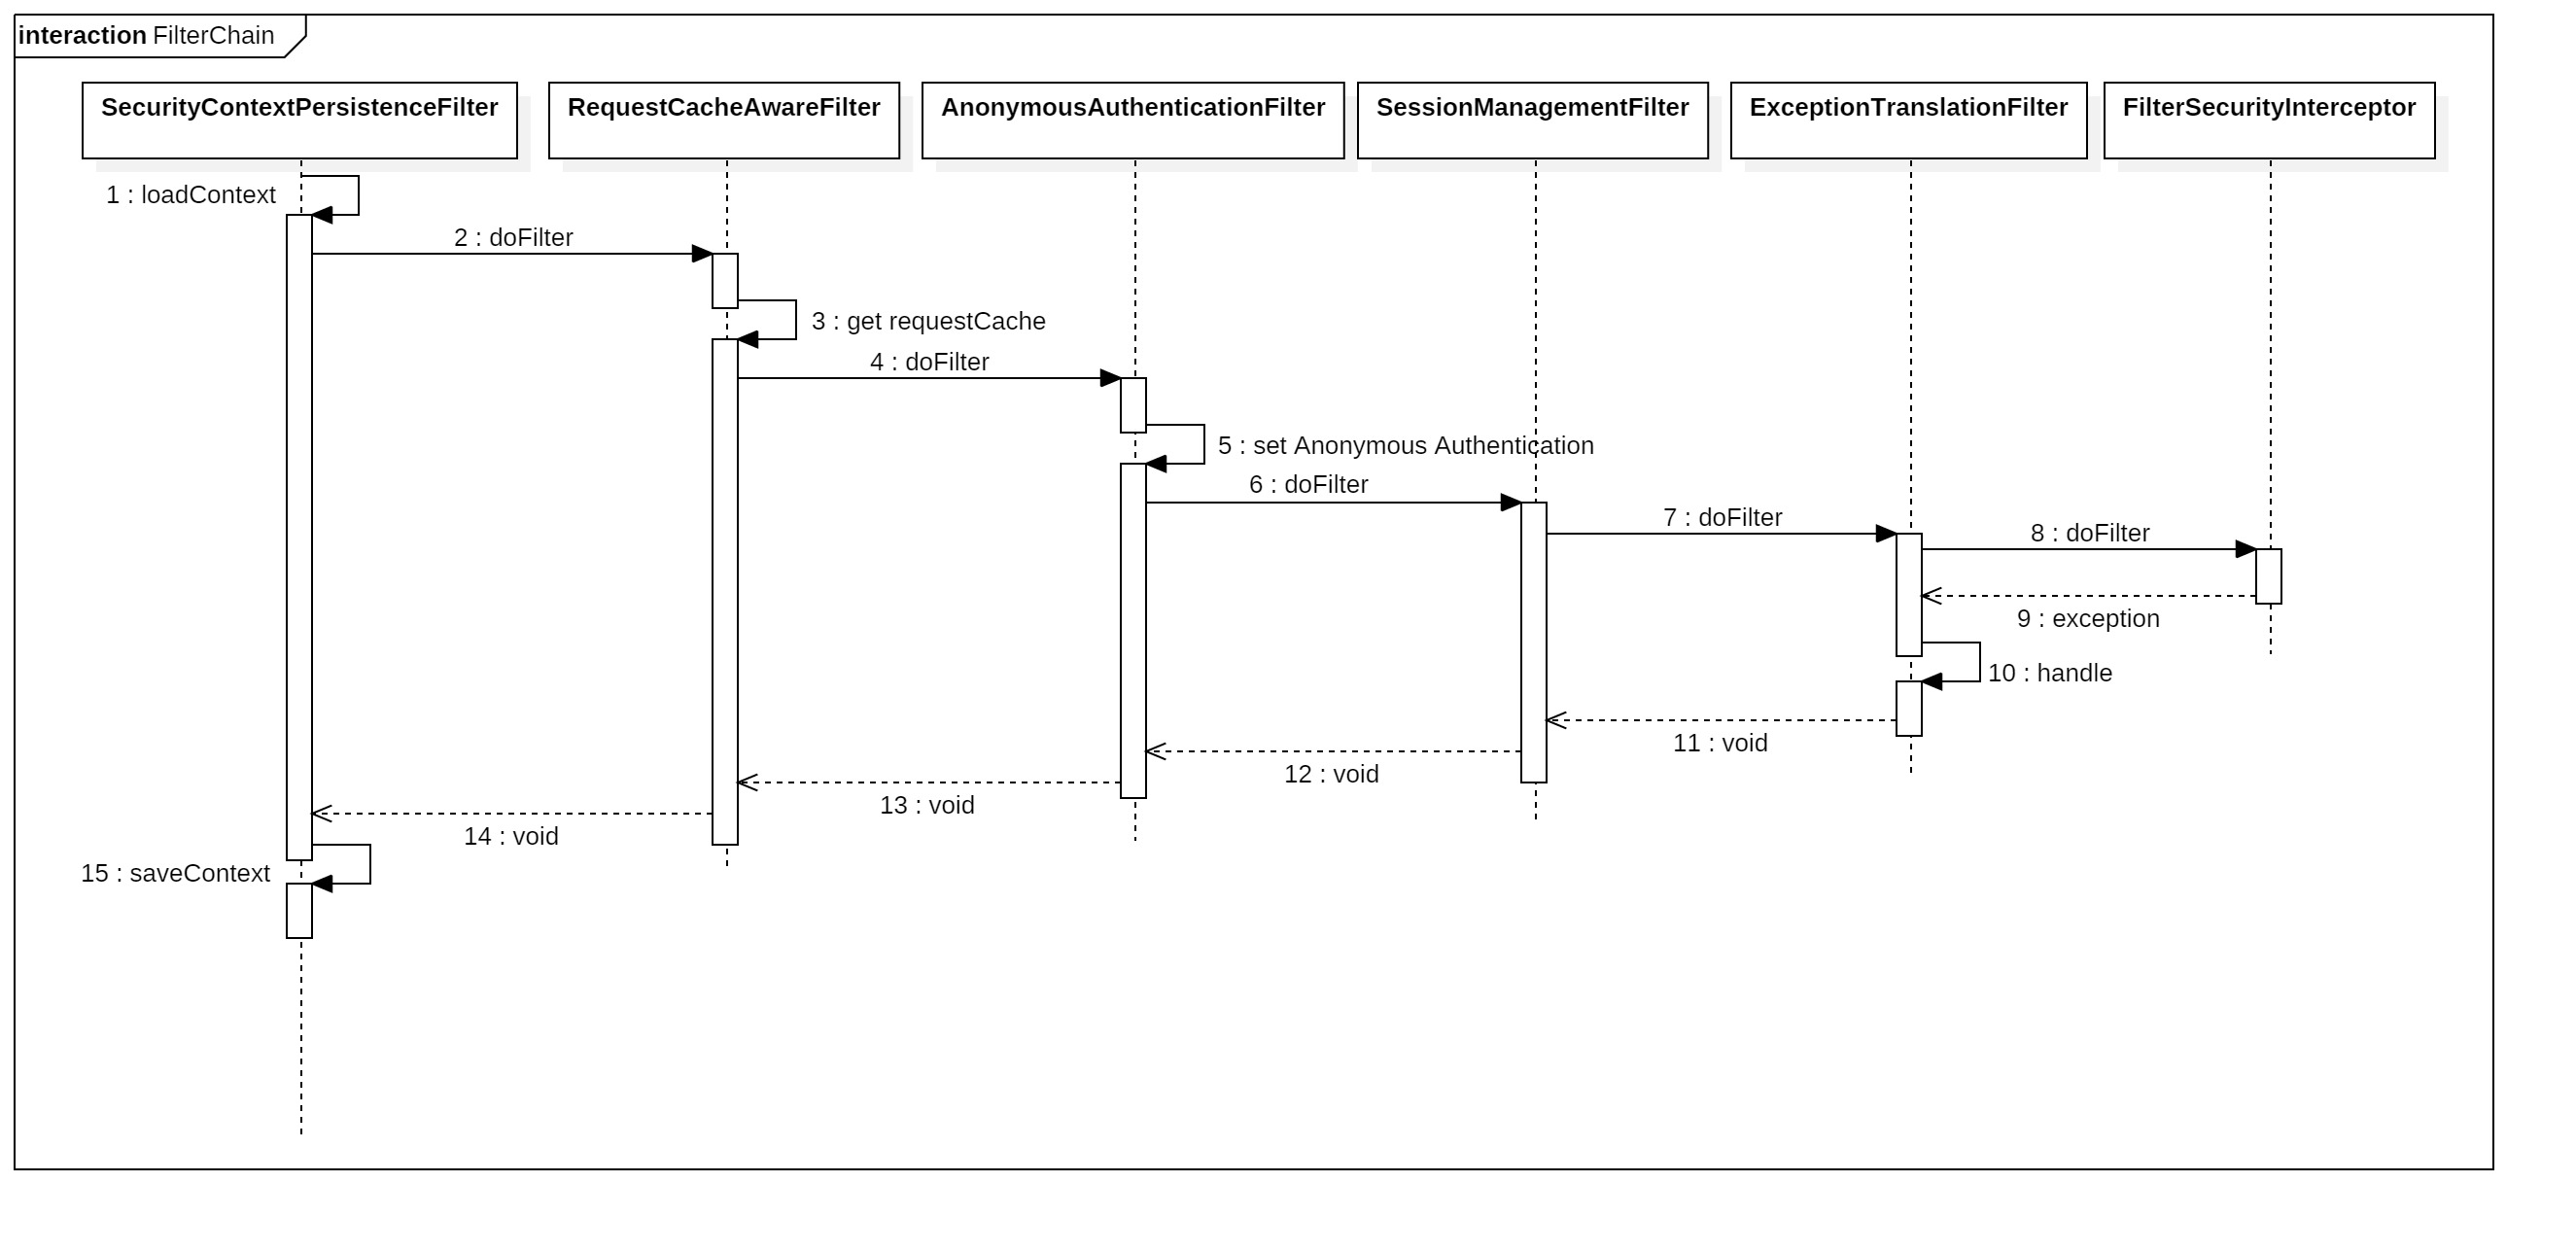
上图列举了一些Filter, 此处将说明这些Filter的作用, 在需要插入自定义Filter时, 这些说明可以作为参考。
-
SecurityContextPersistenceFilter 创建一个空的SecurityContext(如果session中没有SecurityContext实例),然后持久化到session中。在filter原路返回时,还需要保存这个SecurityContext实例到session中。
-
RequestCacheAwareFilter 用于用户登录成功后,重新恢复因为登录被打断的请求
-
AnonymousAuthenticationFilter 如果之前的过滤器都没有认证成功,则为当前的SecurityContext中添加一个经过匿名认证的token, 所有与认证相关的过滤器(如CasAuthenticationFilter)都应当放在AnonymousAuthenticationFilter之前。
-
SessionManagementFilter 1.session固化保护-通过session-fixation-protection配置 2.session并发控制-通过concurrency-control配置
-
ExceptionTranslationFilter 主要拦截两类安全异常:认证异常、访问拒绝异常。而且仅仅是捕获后面的过滤器产生的异常。所以在自定义拦截器时,需要注意在链中的顺序。
-
FilterSecurityInterceptor 通过决策管理器、认证管理器、安全元数据来判断用户是否能够访问资源。
FilterSecurityInterceptor
如果一个http请求能够匹配security定义的规则,那么该请求将进入security处理流程,大体上,security分为三个部分:
- AuthenticationManager 处理认证请求
- AccessDecisionManager 提供访问决策
- SecurityMetadataSource 元数据
以下代码摘自AbstractSecurityInterceptor, 这是FilterSecurityInterceptor的父类, 也正是在此处区分了web请求拦截器与方法调用拦截器。(代码有所精简)
protected InterceptorStatusToken beforeInvocation(Object object) {

	if (!getSecureObjectClass().isAssignableFrom(object.getClass())) {
		throw new IllegalArgumentException();
	}

	Collection<ConfigAttribute> attributes =
	        this.obtainSecurityMetadataSource().getAttributes(object);

	if (attributes == null || attributes.isEmpty()) {
		if (rejectPublicInvocations) {
			throw new IllegalArgumentException();
		}
		publishEvent(new PublicInvocationEvent(object));
		return null; // no further work post-invocation
	}

	if (SecurityContextHolder.getContext().getAuthentication() == null) {
	    //...
	}

	Authentication authenticated = authenticateIfRequired();

	// Attempt authorization
	try {
		this.accessDecisionManager.decide(authenticated, object, attributes);
	}
	catch (AccessDeniedException accessDeniedException) {
		publishEvent(new AuthorizationFailureEvent(object, attributes,
		            authenticated,accessDeniedException));
		throw accessDeniedException;
	}
}


private Authentication authenticateIfRequired() {
    Authentication authentication = SecurityContextHolder.getContext()
            .getAuthentication();

    if (authentication.isAuthenticated() && !alwaysReauthenticate) {
        return authentication;
    }

    authentication = authenticationManager.authenticate(authentication);

    SecurityContextHolder.getContext().setAuthentication(authentication);

    return authentication;
}
在FilterSecurityInterceptor的处理流程中,首先会处理认证请求,获取用户信息,然后决策处理器根据用户信息与权限元数据进行决策,同样,这三个部分都是可以自定义的。
<!-- 自定义过滤器 -->
<bean id="filterSecurityInterceptor"
            class="org.springframework.security.web.access.intercept.FilterSecurityInterceptor">
    <property name="securityMetadataSource" ref="securityMetadataSource"/>
    <property name="authenticationManager" ref="authenticationManager"/>
    <property name="accessDecisionManager" ref="accessDecisionManager"/>
</bean>
AuthenticationManager
AuthenticationManager处理认证请求,然而它并不直接处理,而是将工作委托给了一个ProviderManager,ProviderManager又将工作委托给了一个AuthenticationProvider列表,只要任何一个AuthenticationProvider认证通过,则AuthenticationManager认证通过,我们可以配置一个或者多个AuthenticationProvider,还可以对密码进行加密。
<security:authentication-manager id="authenticationManager">
    <security:authentication-provider user-service-ref="userDetailsService" >
        <security:password-encoder base64="true" hash="md5">
            <security:salt-source user-property="username"/>
        </security:password-encoder>
    </security:authentication-provider>
</security:authentication-manager>
考虑到一种常见情形,用户输入用户名密码,然后与数据比对,验证用户信息,security提供了类来处理。
<bean id="userDetailsService"
            class="org.springframework.security.core.userdetails.jdbc.JdbcDaoImpl" >
     <property name="dataSource" ref="dataSource"/>
</bean>
JdbcDaoImpl使用内置的SQL查询数据,这些SQL以常量的形式出现在JdbcDaoImpl开头,同样可以注入修改。
AccessDecisionManager
AccessDecisionManager提供访问决策,它同样不会直接处理,而是仅仅抽象为一种投票规则,然后决策行为委托给所有投票人。
<!-- 决策管理器 -->
<bean id="accessDecisionManager"
            class="org.springframework.security.access.vote.AffirmativeBased" >
    <property name="allowIfAllAbstainDecisions" value="false"/>
    <constructor-arg index="0">
        <list>
           <!-- <bean class="org.springframework.security.web.access.expression.WebExpressionVoter"/>-->
            <bean class="org.springframework.security.access.vote.RoleVoter">
                <!-- 支持所有角色名称,无需前缀 -->
                <property name="rolePrefix" value=""/>
            </bean>
            <bean class="org.springframework.security.access.vote.AuthenticatedVoter"/>
        </list>
    </constructor-arg>
</bean>
security提供了三种投票规则:
- AffirmativeBased 只要有一个voter同意就通过
- ConsensusBased 只要投同意票的大于投反对票的就通过
- UnanimousBased 需要一致同意才通过
以下为AffirmativeBased决策过程
public void decide(Authentication authentication, Object object,
		Collection<ConfigAttribute> configAttributes) throws AccessDeniedException {
	int deny = 0;

	for (AccessDecisionVoter voter : getDecisionVoters()) {
		int result = voter.vote(authentication, object, configAttributes);

		switch (result) {
		case AccessDecisionVoter.ACCESS_GRANTED:
			return;

		case AccessDecisionVoter.ACCESS_DENIED:
			deny++;

			break;

		default:
			break;
		}
	}

	if (deny > 0) {
		throw new AccessDeniedException(messages.getMessage(
				"AbstractAccessDecisionManager.accessDenied", "Access is denied"));
	}

	// To get this far, every AccessDecisionVoter abstained
	checkAllowIfAllAbstainDecisions();
}
SecurityMetadataSource
SecurityMetadataSource定义权限元数据(如资源与角色的关系),并提供了一个核心方法Collection<ConfigAttribute> getAttributes(Object object)来获取资源对应的角色列表,这种结构非常类似于Map。
security提供了DefaultFilterInvocationSecurityMetadataSource来进行角色读取操作,并将数据存储委托给一个LinkedHashMap对象。
<!-- 资源与角色关系元数据 -->
<bean id="securityMetadataSource"
            class="org.springframework.security.web.access.intercept.DefaultFilterInvocationSecurityMetadataSource">
    <constructor-arg index="0">
        <bean class="top.rainynight.site.core.RequestMapFactoryBean">
            <property name="dataSource" ref="dataSource"/>
        </bean>
    </constructor-arg>
</bean>
DefaultFilterInvocationSecurityMetadataSource获取角色方法
public Collection<ConfigAttribute> getAttributes(Object object) {
	final HttpServletRequest request = ((FilterInvocation) object).getRequest();
	for (Map.Entry<RequestMatcher, Collection<ConfigAttribute>> entry : requestMap
			.entrySet()) {
		if (entry.getKey().matches(request)) {
			return entry.getValue();
		}
	}
	return null;
}